Hadoop Installation Guide 15 Feb 2017
In my research I am working with a lot of networking data and trying to find ways to secure that data, more about the securing part later in another post. But the thing is we needed a way to store NetFlow Data, data generated by routers and switches in a 100GB network. So we decided that this problem was great for trying some Big Data solutions. Big Data is nowadays more like buzz word, it has an unclear definition but most people would consider dealing with TB of data or more as dealing with Big Data. When dealing with Big Data we are intersted in the 3V’s: Volume, Variety and Velocity. We needed a solution that can deal well with those things, a lot of incoming data from different points in the 100GB network, the data had some variety but not much and the speed at which the data was coming to us was pretty high - we were supposed to deal with anything between 1 and 3GB per hour.
So what we needed was to be able to store the data in a costeffective way, and we need to be able to process it efficiently. And it turns out that these are not easy problems to solve when we’re talking about massive amounts of data. Fortunately, though, some extremely smart people at Google were working on them in the late 1990s and released the results of their work as research papers in 2003 and 2004. From those papers there was an open source project that started: Hadoop, which is what we decided to use as well.
What is a Apache Hadoop and MapReduce?
The core Hadoop project consists of a way to store data, known as the Hadoop Distributed File System, or HDFS, and a way to process the data, called MapReduce. The key concept is that we split the the data up and store it across a collection of machines, known as a cluster. Then, when we want to process the data, we process it where it’s actually stored. Rather than retrieving the data from a central server, instead it’s already on the cluster, and we can process it in place. You can add more machines to the cluster as the amount of data you’re storing grows.
How are files stored in HDFS?
Files are stored in something called the Hadoop Distributed File System, which everyone just refers to as HDFS. As a developer, this looks very much like a regular filesystem the kind you’re used to working with on a standard machine. But it’s helpful to understand what’s going on behind the scenes, so that’s what we’re going to talk about here.
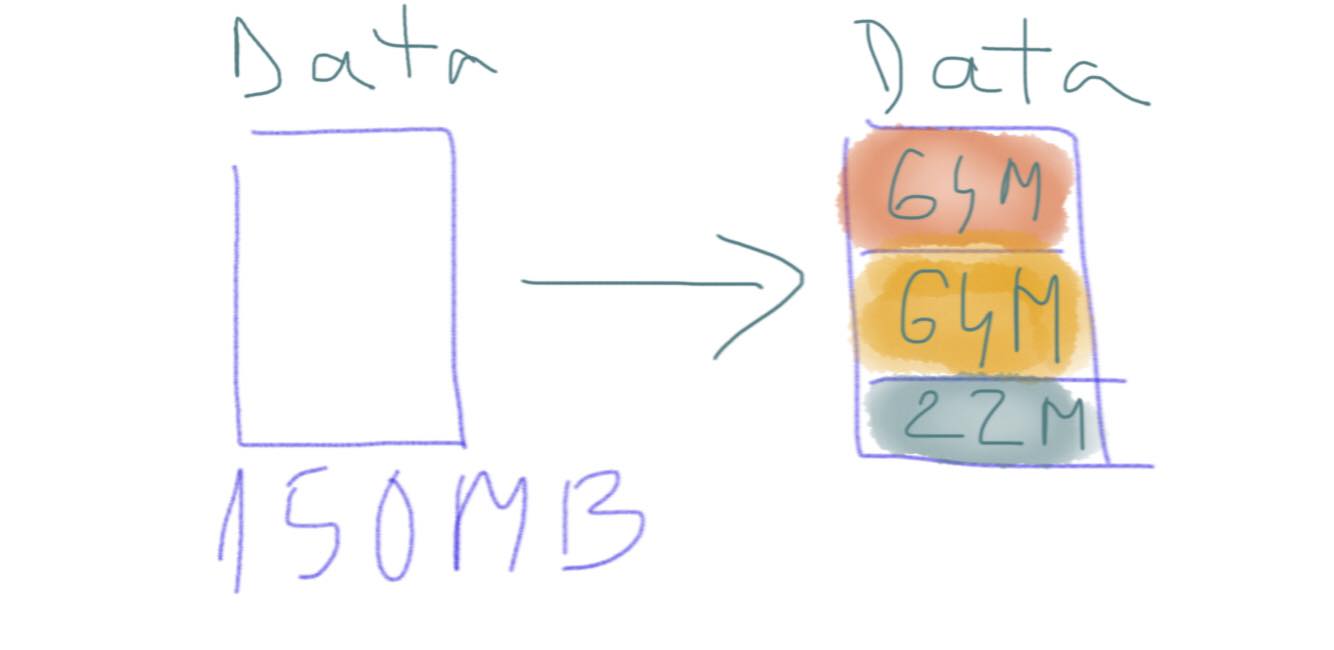
When a file is loaded into HDFS, it’s split into chunks, which we call ‘blocks’. Each block is pretty big; the default is 64 megabytes. So, imagine we’re going to store a file called ‘mydata.txt’, which is 150 megabytes in size. As it’s uploaded to the cluster, it’s split into 64 megabyte blocks, and each block will be stored on one node in the cluster. Each block is given a unique name by the system: it’s actually just ‘blk’, then an underscore, then a large number. In this case, the file will be split into three blocks: the first will be 64 megabytes, the second will be 64 megabytes, and the third will be the remaining 22 megabytes
There’s a daemon, or piece of software, running on each of these cluster nodes called the DataNode, which takes care of storing the blocks.
Now, clearly we need to know which blocks make up the file. That’s handled by a separate machine, running a daemon called the NameNode. The information stored on the NameNode is known as the ‘metadata’.
Looking at what we know about the Hadoop file system so far, network and disk failures are certainly a problem. To solve this, Hadoop replicates each block three times as it’s stored in HDFS. If a single node fails, it’s not a problem because we have two other copies of the block on other nodes. And the NameNode is smart enough that if it sees that any of the blocks are underreplicated, it will arrange to have those blocks rereplicated on the cluster so we’re back to having three copies of them again.
For a long time, the NameNode was a single point of failure in Hadoop. If it died , the entire cluster was inaccessible. And if the metadata on the NameNode was lost, the entire cluster’s data was lost. Sure, you’ve still got all the blocks on the DataNodes, but you’ve no way of knowing which block belongs to which file without the metadata. So to avoid that problem, people would configure the NameNode to store the metadata not just on its own hard drive but also somewhere else on the network using NFS, which is a method of mounting a remote disk on the NameNode. That way, even if the NameNode burst into flames, there would be a copy of the metadata somewhere else on the network. These days, the problem of the NameNode being a single point of failure has been solved. Most production Hadoop clusters now have two NameNodes: one Active, and one Standby. The Active NameNode works as before, but the Standby can be configured to take over automatically if the Active one fails. That way, the cluster will keep running if any of the nodes even one of the NameNodes fails.
How is data processed with MapReduce?
Now we’ve seen how files are stored in HDFS, let’s discuss how that data is processed with MapReduce. Say I had a large file. Processing that serially from the top to the bottom could take a long time.
Instead, mapreduce is designed to be a very parallelized way of managing data, meaning that your input data is split into many pieces, and each piece is processed simultaneously. To explain, let’s take a realworld scenario.
Let’s imagine we run a retailer with thousands of stores around the world. And we have a log file which contains all the sales from all the stores, organized by date. We’ve been asked to calculate the total sales generated by each store over the last year.
Now, one way to do that would be just to start at the beginning of the log file and, for each entry, write the store name and the amount next to it. For the next entry, I need to see if I’ve already got that store written down; if I have, I can add the amount to that store. If not, I write down a new store name and that first purchase. And so on, and so on.
Typically, this is how we’d solve things in a traditional computing environment: we’d create some kind of associative array or hashtable for the stores then process the input file one entry at a time. This is going to take an awfully long time for your computer to first read the file from a disk and then to process, you have millions and millions of sales to process. Also, the more stores you have, the longer it takes you to check my total sheet, find the right store, and add the new value to the running total for that store. But again, it would take a long time and you may even run out of memory to hold your array if you really do have a huge number of stores. So instead, let’s see how you would do this as a MapReduce job.
We’ll take the staff in the accounts department and split them into two groups, We’ll call them the Mappers and the Reducers. Then we’ll break the log file down into chunks, and give each chunk to one of the Mappers. All of the Mappers can work at the same time, and each one is working on just a small fraction of the overall data. Here’s what a Mapper will do. They will take the first record in their chunk of the log file, and on an index card they’ll write the store name as the heading. Underneath, they’ll write the sale amount for that record. Then they’ll take the next record, and do the same thing. As they’re writing the index cards, they’ll pile them up so that all the cards for one particular store go on the same pile. By the end, each Mapper will have a pile of cards per store.
Once the Mappers have finished, the Reducers can collect their sets of cards. We tell each Reducer which stores they’re responsible for. The Reducers go to all the Mappers and retrieve the piles of cards for their own stores. It’s fast for them to do, because each Mapper has separated the cards into a pile per store already. Once the Reducers have retrieved all their data, they collect all the small piles per store and create a large pile per store. Then they start going through the piles, one at a time. All they have to do at this point is add up all the amounts on all the cards in a pile, and that gives them the total sales for that store, which they can write on their final total sheet. And to keep things organized, each Reducer goes through his or her set of piles of cards in alphabetical order.
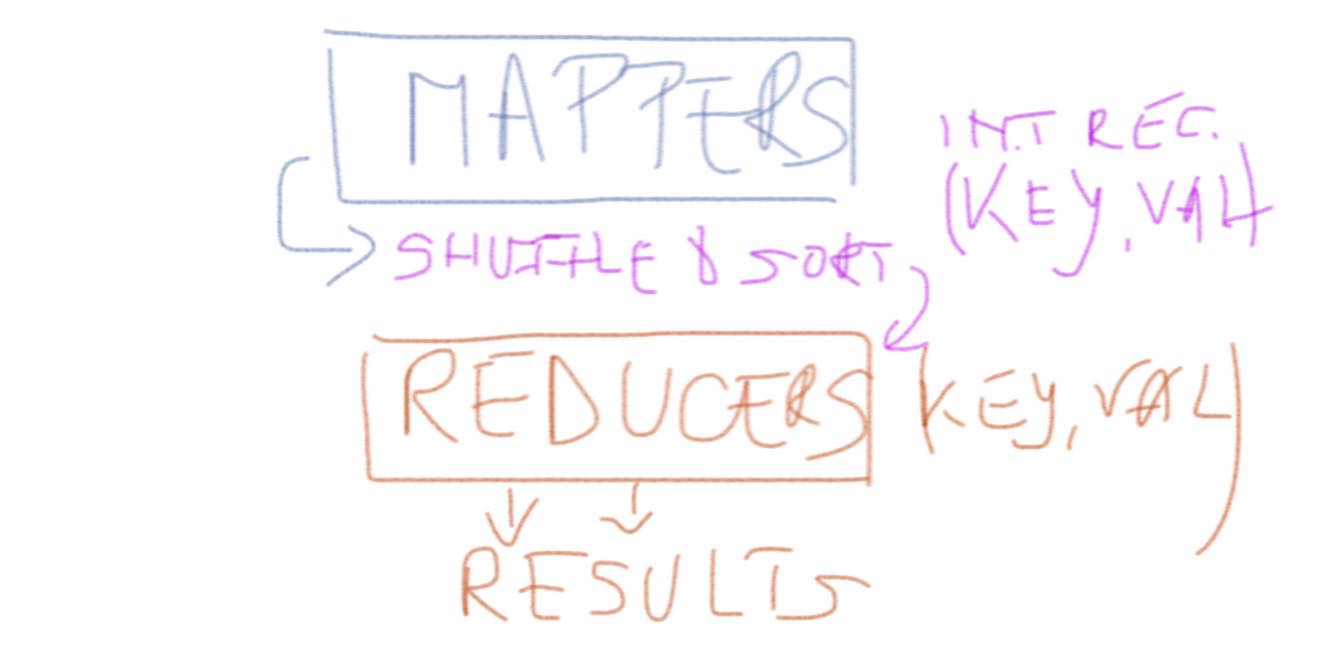
And that’s MapReduce! The Mappers are programs which each deal with a relatively small amount of data, and they all work in parallel. The Mappers output what we call ‘intermediate records’, which in this case were our index cards. Hadoop deals with all data in the form of records, and records are keyvalue pairs. In this example, the key was the store name, and the value was the sale total for that particular piece of input. Once the Mappers have finished, a phase of MapReduce called the ‘Shuffle and Sort’ takes place. The shuffle is the movement of the intermediate data from the Mappers to the Reducers and the combination of all the small sets of records together, and the sort is the fact that the Reducers will organize the sets of records the piles of index cards in our example into order. Finally, the Reduce phase works on one set of records one pile of cards at a time; it gets the key, and then a list of all the values, it processes those values in some way (adding them up in our case) and then it writes out its final data for that key.
Setting up a fully distributed cluster
Now that we have some knowledge about the under the hood processes of Hadoop and MapReduce we can go on to try and test it all out, by first installing Hadoop locally. Setting up Hadoop in a single machine is easy, but no fun. Why? Because Hadoop is not meant for a single machine. Hadoop is meant to run on a computing cluster comprising of many machines. Running HDFS and MapReduce on a single machine is great for learning about these systems, but to do useful work we need to run Hadoop on multiple nodes. So, we are going to install Hadoop on a cluster.
Cluster Topology
We have 3 machines in our cluster, we are going to use 2 of them as DataNodes and the other one will be the Namenode. The IP addresses of the machines can be seen bellow.
NameNode        10.2.0.10
DataNode1        10.2.0.1
DataNode2        10.2.0.2
Setting up the NameNode
- first we need to install Java Environment
root@NameNode:~# apt-get update
root@NameNode:~# apt-get install openjdk-8-jdk
root@NameNode:~# java -version
java version "1.8.0_121"
OpenJDK Runtime Environment (IcedTea 2.6.8) (7u121-2.6.8-1ubuntu0.14.04.1)
OpenJDK 64-Bit Server VM (build 24.121-b00, mixed mode)- setup machine alias in /etc/hosts file
root@NameNode:~# vim /etc/hosts

10.2.0.10 NameNode- setuo SSH server: Hadoop control scripts rely on SSH to perform cluster-wide operations. For example, there is a script for stopping and starting all the daemons in the clusters. To work seamlessly, SSH needs to be setup to allow password-less & passphrase-less login for the root/hadoop user from machines in the cluster. The simplest way to achieve this is to generate a public/private key pair, and it will be shared across the cluster.
root@NameNode:~# apt-get install openssh-server
root@NameNode:~# ssh-keygen -t rsa -P ""
root@NameNode:~# cat /root/.ssh/id_rsa.pub >> /root/.ssh/authorized_keys
root@NameNode:~# chmod 700 ~/.ssh
root@NameNode:~# chmod 600 ~/.ssh/authorized_keys
To check that you set up correctly the password-less login for root, login with ssh at localhost:
root@NameNode:~# ssh localhost- download and install Hadoop files
root@NameNode:~# cd /usr/local/
root@NameNode:/usr/local/# wget http://www.us.apache.org/dist/hadoop/common/hadoop-2.7.2/hadoop-2.7.2.tar.gz
root@NameNode:/usr/local/# tar -xzvf hadoop-2.7.2.tar.gz >> /dev/null
root@NameNode:/usr/local/# mv hadoop-2.7.2 /usr/local/hadoop
root@NameNode:/usr/local/# mkdir -p /usr/local/hadoop_work/hdfs/namenode
root@NameNode:/usr/local/# mkdir -p /usr/local/hadoop_work/hdfs/namesecondary- setup environment variables: we will setup some environment variables in .bashrc so that every time we restart our machines, it knows where to find Java or Hadoop installation location inside the machine.
root@NameNode:~# vim ~/.bashrc
export JAVA_HOME=/usr/lib/jvm/java-1.8.0-openjdk-amd64
export PATH=$PATH:$JAVA_HOME/bin
export HADOOP_HOME=/usr/local/hadoop
export PATH=$PATH:$HADOOP_HOME/bin
export PATH=$PATH:$HADOOP_HOME/sbin
export HADOOP_MAPRED_HOME=$HADOOP_HOME
export HADOOP_COMMON_HOME=$HADOOP_HOME
export HADOOP_HDFS_HOME=$HADOOP_HOME
export YARN_HOME=$HADOOP_HOME
export HADOOP_COMMON_LIB_NATIVE_DIR=$HADOOP_HOME/lib/native
export HADOOP_OPTS="-Djava.library.path=$HADOOP_HOME/lib"
export CLASSPATH=$CLASSPATH:/usr/local/hadoop/lib/*:.

export HADOOP_OPTS="$HADOOP_OPTS -Djava.security.egd=file:/dev/../dev/urandom"- setup JAVA_HOME under the hadoop environment and confirm that Hadoop is installed
root@NameNode:~# vi /usr/local/hadoop/etc/hadoop/hadoop-env.sh
> export JAVA_HOME=/usr/lib/jvm/java-1.8.0-openjdk-amd64
root@NameNode:~# hadoop version- configure core-site.xml : this XML configuration file lets you setup site specific properties, such as I/O settings that are common to HDFS and MapReduce. Open the file and put the following properties:
root@NameNode:~# vim /usr/local/hadoop/etc/hadoop/core-site.xml
<?xml version="1.0"?>
<!-- core-site.xml -->
<configuration>
<property>
<name>fs.defaultFS</name>
<value>hdfs://NameNode:8020/</value>
</property>
<property>
<name>io.file.buffer.size</name>
<value>131072</value>
</property>
</configuration>- configure hdfs-site.xml
root@NameNode:~# vim /usr/local/hadoop/etc/hadoop/core-site.xml
<!-- hdfs-site.xml -->
<configuration>
<property>
<name>dfs.namenode.name.dir</name>
<value>file:/usr/local/hadoop_work/hdfs/namenode</value>
</property>
<property>
<name>dfs.datanode.data.dir</name>
<value>file:/usr/local/hadoop_work/hdfs/datanode</value>
</property>
<property>
<name>dfs.namenode.checkpoint.dir</name>
<value>file:/usr/local/hadoop_work/hdfs/namesecondary</value>
</property>
<property>
<name>dfs.replication</name>
<value>2</value>
</property>
<property>
<name>dfs.block.size</name>
<value>134217728</value>
</property>
</configuration>- configure the mapred-site.xml : this controls the configuration for the map reduce daemons
root@NameNode:~# cp /usr/local/hadoop/etc/hadoop/mapred-site.xml.template /usr/local/hadoop/etc/hadoop/mapred-site.xml
root@NameNode:~# vim /usr/local/hadoop/etc/hadoop/mapred-site.xml
<?xml version="1.0"?>
<!-- mapred-site.xml -->
<configuration>
<property>
<name>mapreduce.framework.name</name>
<value>yarn</value>
</property>
<property>
<name>mapreduce.jobhistory.address</name>
<value>NameNode:10020</value>
</property>
<property>
<name>mapreduce.jobhistory.webapp.address</name>
<value>NameNode:19888</value>
</property>
<property>
<name>yarn.app.mapreduce.am.staging-dir</name>
<value>/user/app</value>
</property>
<property>
<name>mapred.child.java.opts</name>
<value>-Djava.security.egd=file:/dev/../dev/urandom</value>
</property>
</configuration>- configure yarn-site.xml : this gives you the possibility to set up specific properties for Resource Manager and Node Manager
root@NameNode:~# vim /usr/local/hadoop/etc/hadoop/yarn-site.xml
<?xml version="1.0"?>
<!-- yarn-site.xml -->
<configuration>
<property>
<name>yarn.resourcemanager.hostname</name>
<value>NameNode</value>
</property>
<property>
<name>yarn.resourcemanager.bind-host</name>
<value>0.0.0.0</value>
</property>
<property>
<name>yarn.nodemanager.bind-host</name>
<value>0.0.0.0</value>
</property>
<property>
<name>yarn.nodemanager.aux-services</name>
<value>mapreduce_shuffle</value>
</property>
<property>
<name>yarn.nodemanager.aux-services.mapreduce_shuffle.class</name>
<value>org.apache.hadoop.mapred.ShuffleHandler</value>
</property>
<property>
<name>yarn.log-aggregation-enable</name>
<value>true</value>
</property>
<property>
<name>yarn.nodemanager.local-dirs</name>
<value>file:/usr/local/hadoop_work/yarn/local</value>
</property>
<property>
<name>yarn.nodemanager.log-dirs</name>
<value>file:/usr/local/hadoop_work/yarn/log</value>
</property>
<property>
<name>yarn.nodemanager.remote-app-log-dir</name>
<value>hdfs://NameNode:8020/var/log/hadoop-yarn/apps</value>
</property>
</configuration>- setup the master
root@NameNode:~# vim /usr/local/hadoop/etc/hadoop/masters
NameNode- setup the slaves
root@NameNode:~# vim /usr/local/hadoop/etc/hadoop/slaves
DataNode1
DataNode2- add the DataNodes to the /etc/hosts
root@NameNode:~# vim /etc/hosts
10.2.0.10   NameNode
10.2.0.1    DataNode1
10.2.0.2 DataNode2- Now that we are done with setting up the NameNode we will copy all the configuration files from this machine to the DataNodes. But first copy the public key from the NameNode to each of the DataNodes, in order to be able to ssh into those with no key.
root@NameNode:# cat ~/.ssh/id_rsa.pub

#Output Public Key looks something like below
ssh-rss AA21....
....l5Mq4r root@NameNode
And now on each of the DataNodes:
root@DataNode1:~# vi ~/.ssh/authorized_keys
(append the copied key at the end of this file)
root@DataNode1:~# mkdir -p /usr/local/hadoop_work/hdfs/datanode
root@DataNode1:~# mkdir -p /usr/local/hadoop_work/yarn/local
root@DataNode1:~# mkdir -p /usr/local/hadoop_work/yarn/log- Copy the already configured files to the DataNodes
root@NameNode:/usr/local# scp -r hadoop DataNode1:/usr/local
root@NameNode:/usr/local# scp -r hadoop DataNode2:/usr/local
root@NameNode:/usr/local# scp /etc/hosts DataNode1:/etc/hosts
root@NameNode:/usr/local# scp /etc/hosts DataNode2:/etc/hosts- Create the structure of folders we have been setting up in our configuration files
root@NameNode:~# hadoop fs -mkdir /tmp
root@NameNode:~# hadoop fs -chmod -R 1777 /tmp

root@NameNode:~# hadoop fs -mkdir /user
root@NameNode:~# hadoop fs -chmod -R 1777 /user
root@NameNode:~# hadoop fs -mkdir /user/app
root@NameNode:~# hadoop fs -chmod -R 1777 /user/app

root@NameNode:~# hadoop fs -mkdir -p /var/log/hadoop-yarn
root@NameNode:~# hadoop fs -chmod -R 1777 /var/log/hadoop-yarn
root@NameNode:~# hadoop fs -mkdir -p /var/log/hadoop-yarn/apps
root@NameNode:~# hadoop fs -chmod -R 1777 /var/log/hadoop-yarn/apps- Start the cluster and check that all the processes are running
root@NameNode:~# $HADOOP_HOME/sbin/start-dfs.sh
root@NameNode:~# $HADOOP_HOME/sbin/start-yarn.sh
root@NameNode:~# jps
#Output looks similar like the one below
18465 NameNode
18466 SecondaryNameNode
18467 ResourceManager
18468 JobHistoryServer
And if we run the same command on any of the DataNodes we should get:
root@DataNode1:~# jps
#Output looks similar like the one below
18465 DataNode
18466 NodeManager
Conclusion
To test out your installation you can run one of the sample applications that Hadoop comes with:
root@NameNode:~# hadoop jar /usr/local/hadoop/share/hadoop/mapreduce/hadoop-mapreduce-examples-2.7.2.jar pi 2 4